Debian email server with Dovecot, Postfix, and MySQL
This article explains how to set up an email server from scratch in a Debian-based Linux environment. It is long and includes many steps, but I have tried to summarize and explain what matters most to the service. This walkthrough is based on several articles I read and on the email solution I use on some servers; the main references are at the end.
An email service consists of several applications, each with a specific role, and configuring them together is the biggest challenge. This article covers everything from the hostname and DNS to webmail. I hope it helps anyone who wants to run an email server instead of relying on free services that may charge for or read your data without your knowledge.
Which services are involved?
An email server relies on several services, many of which help maintain quality by filtering and identifying spam. Here is a list of the applications and their responsibilities.
Postfix: sends email over SMTP. Your email application and external servers connect to it to deliver messages to your mailbox or relay them to another email server;
Dovecot: manages mailboxes on your server. It provides IMAP and POP3 access, and Postfix also uses it to store received messages;
MySQL: stores domain, mailbox, and mailbox-password information used by Postfix and Dovecot;
Amavisd-new: a mail server commonly uses applications to check for viruses and spam. Amavisd-new connects the MTA (Mail Transfer Agent) to these filters. Postfix forwards received messages to Amavisd-new, which works with one or more services to identify and flag potential problems.
ClamAV: a popular open-source antivirus service used by many servers to scan large numbers of files quickly;
Postgrey: quarantines suspicious email until another message from the same source arrives or a period for identifying new viruses has passed. This slows the spread of new spam or viruses while other services update their signatures;
SpamAssassin: Postfix also uses SpamAssassin to score potential spam. It is widely used and supports detection methods ranging from SPF to statistical analysis of suspicious words;
PostfixAdmin: a web application for managing mailboxes in MySQL. Use it to add domains and mailboxes, create aliases, and set account limits;
Roundcube: provides webmail so users do not have to install an email client such as Thunderbird or Outlook;
Apache: serves Roundcube and PostfixAdmin. We will also install PHP modules, since both web applications are written in PHP;
OpenSSL: generates certificates and CSRs used to secure HTTP and IMAP, POP, and SMTP connections with SSL/TLS;
iptables: configures the server firewall.
In addition to these applications, you must configure DNS for the domain that will host your mailboxes. Use any service that lets you configure A, MX, and TXT records.
Preparing the environment
As mentioned at the beginning, this tutorial targets Debian 6 or 7. Other distributions may differ slightly; search online if you get stuck. I have used this setup on a 512 MB RAM, one-vCore DigitalOcean VPS and believe it can comfortably support around 50 moderately active IMAP accounts, limited mainly by disk space. On a stronger server, such as a 2 GB RAM, 8-vCore Linode instance, you can also host several moderately used websites without noticeably delaying email delivery.
First, decide on a hostname for your email server. The entire installation will use this name, and you will configure your domains' DNS to point to it.
Domains such as example.com commonly use a separate server for email, such as mail.example.com. Email is critical to most businesses, so a dedicated server is preferable for security and performance. This example uses mail.example.com. A dedicated server or a mail subdomain is a good practice, not a requirement.
Log in to the server as root and set its hostname to the name you chose for the mail server.
echo "mail.exemplo.com" > /etc/hostname
hostname -F /etc/hostname
Some hosting services may change the hostname automatically because DHCP is enabled by default. To prevent this, edit /etc/default/dhcpcd and comment out a line similar to SET_HOSTNAME='yes'.
Remember to edit /etc/hosts and map the machine's own names to the loopback address.
127.0.0.1 localhost mail mail.paulo.ccThis guide stores mailboxes, webmail, and account-management applications under a common directory in /var named mailserver. Update the server's installed packages with apt-get, since several applications will be installed in the next steps.
mkdir /var/mailserver
apt-get update
apt-get upgrade
This tutorial consistently uses
example.comandmail.example.com. Replace them with the domains you chose for your server.
Digital certificates for SSL/TLS connections
Email services were developed when security was not a major concern. Early implementations of SMTP, IMAP, and POP3 did not encrypt traffic, so passwords were sent in plain text and could be read by a malicious user. SSL and TLS were later added to provide basic protection.
This guide uses a certificate and private key to secure connections. Ideally, obtain a certificate from a certificate authority just as you would for an Apache HTTP site, but this may cost anywhere from 10 to 1,000 reais, depending on the authority's reputation.
If you already have an SSL certificate for your web server, you can use it for email too. The drawback is that the web and mail servers must use the same domain name. A wildcard certificate also works for both, but costs more.
For this tutorial, we will create a certificate signed by our own certificate authority. This has two drawbacks. First, every client will see a warning that the certificate was issued by an unknown authority (the familiar red screen or security-exception prompt). Second, this type of certificate does not work well for connections that start directly with SSL/TLS.
Clients can connect to SMTP/IMAP/POP3 in three ways:
Insecure: the client connects without requesting encryption, sending everything as plain text that anyone can read;
Secure with STARTTLS: the connection starts like the insecure case, then the client requests an upgrade before sending sensitive data, using the STARTTLS command;
Secure with SSL/TLS: the client requests an encrypted connection immediately. The server begins by sending the certificate and public key for the client to use.
The last method is the most secure, but it requires a certificate from a trusted authority. You could generate certificates and install them on every machine, but you would still need to distribute them to all users. A certificate from a trusted authority is preferable. This guide ensures at least STARTTLS-level security, which is enough to protect email passwords. Use the commands below to create a certificate authority and a certificate signed by it.
# Você precisará informar o nome do seu servidor de e-mail (exatamente igual) quando a seguinte
# pergunta for feita:
# Common Name (e.g. server FQDN or YOUR name) []
# No nosso caso preencheriamos com mail.exemplo.com
openssl req -x509 -nodes -days 365 -newkey rsa:2048 \
	-keyout /etc/ssl/private/mail.exemplo.com.key \
	-out /etc/ssl/certs/mail.exemplo.com.crt

# Ajustamos as permissões
chmod 600 /etc/ssl/private/mail.exemplo.com.key
chmod 600 /etc/ssl/certs/mail.exemplo.com.crt
Configuring Apache, MySQL, and PHP
Install the required packages with the following command. You will be asked to set a password for the database root user; keep it safe.
apt-get install apache2 php5 php5-cli mysql-server php5-curl php5-gd php5-imap php5-mcrypt php5-mysql php5-intlTuning PHP
After installing the packages, I recommend adjusting a few PHP settings. Edit /etc/php5/apache2/php.ini and change the following values.
# Ajuste e mamória máxima que pode ser utilizada pelas aplicações web
memory_limit = 128M
# Ajuste o tamanho máximo do arquivo aceito pelo PHP. Importante para que o webmail aceite
# anexos maiores que 2MB
upload_max_filesize = 16M
post_max_size = 16M
# Ajuste básicos de segurança, para não identificar que você roda PHP no servidor
expose_php = Off
# Ajuste para não perder a sessão o tempo todo (tempo em segundos)
session.gc_maxlifetime = 21600
# Ajuste de fuso horário
# Lista de timezones http://php.net/manual/en/timezones.php
date.timezone = America/Sao_Paulo
Configuring the Apache virtual host
Enable a few Apache modules so webmail works and the server accepts HTTPS connections. Enable both rewrite, which allows URL rewriting, and ssl.
a2enmod rewrite sslI also recommend changing a few Apache security settings to avoid disclosing the server version and technology. Edit /etc/apache2/conf.d/security and adjust the two parameters below.
ServerTokens Prod
ServerSignature Off
Next, create a virtual host for webmail and the application used to create email accounts. Create /etc/apache2/sites-available/mailserver and add the following content.
<VirtualHost *:80>
    ServerAdmin seuemail@exemplo.com
    ServerName mail.exemplo.com
    DocumentRoot /var/mailserver/webmail
    <Directory /var/mailserver/webmail>
        Options Indexes FollowSymLinks MultiViews
        AllowOverride All
        Order allow,deny
        Allow from all
    </Directory>
    ErrorLog ${APACHE_LOG_DIR}/error-mailserver.log
    LogLevel warn
    CustomLog ${APACHE_LOG_DIR}/access-mailserver.log combined
</VirtualHost>

<IfModule mod_ssl.c>
    <VirtualHost *:443>
    # Se possuir um IP específico comente a linha acima e descomente abaixo
    # Ajustando o IP
    #<VirtualHost 1.2.3.4:443>
        ServerAdmin seuemail@exemplo.com
        ServerName mail.exemplo.com
        DocumentRoot /var/mailserver/webmail
        <Directory /var/mailserver/webmail>
            Options Indexes FollowSymLinks MultiViews
            AllowOverride All
            Order allow,deny
            allow from all
        </Directory>
        ErrorLog ${APACHE_LOG_DIR}/error-mailserver.log
        CustomLog ${APACHE_LOG_DIR}/ssl-mailserver.log combined
        SSLEngine on
        # Caminhos para os dados de certificado
        SSLCertificateFile    /etc/ssl/certs/mail.exemplo.com.crt
        SSLCertificateKeyFile /etc/ssl/private/mail.exemplo.com.key
        # Em alguns casos é preciso ajustar os certificados de cadeia ou de autoridade,
        # verifique com sua certificadora os detalhes
        #SSLCACertificateFile /etc/ssl/certs/cacert.pem
        #SSLCertificateChainFile /path/to/my/ca-bundle.crt
        # Ajustes para o Internet Explorer
        BrowserMatch "MSIE [2-6]" nokeepalive ssl-unclean-shutdown downgrade-1.0 force-response-1.0
        BrowserMatch "MSIE [17-9]" ssl-unclean-shutdown
    </VirtualHost>
</IfModule>
In some cases, you must also set ServerName and configure Apache to use virtual hosts for domains. Edit /etc/apache2/ports.conf as shown below:
ServerName mail
NameVirtualHost *:80
Listen 80
<IfModule mod_ssl.c>
    # Se possuir mais de um IP na máquina e quiser usar um específico para o SSL
    # Não esqueça de ajustar o IP no arquivo do virtualhost e descomentar a linha abaixo
    # e comentar a liga abaixo dela
    # NameVirtualHost 1.2.3.4:443
    NameVirtualHost *:443
    # Nota: Clientes com Windows XP não suportam SNI e portanto você não pode usar um
    # mesmo IP para mais de um virtualhost!
    Listen 443
</IfModule>
Remember to create the webmail directory and enable the virtual host.
mkdir /var/mailserver/webmail
a2ensite mailserver
/etc/init.d/apache2 restart
MySQL settings and databases
After configuring the domains and PHP, adjust some MySQL settings. I recommend editing /etc/mysql/my.cnf, commenting out the bind-address line, and preventing MySQL from resolving the names of all database clients by adding skip-name-resolv.
#bind-address           = 127.0.0.1
skip-name-resolv
Restart the database so it loads the new settings. Then connect to MySQL and create the database that will store webmail preferences and the email accounts.
/etc/init.d/mysql restart
mysql -uroot -p # Utilize a senha que inseriu na instalação do banco de dados
After entering the password, a MySQL prompt opens. Run the SQL below to create the databases and users. Keep the usernames, passwords, and database names; the other applications need them in their configuration.
CREATE DATABASE mail;
GRANT ALL ON mail.* TO 'mail'@'127.0.0.1' IDENTIFIED BY 'mailpass';
CREATE DATABASE roundcube;
GRANT ALL ON roundcube.* TO 'roundcube'@'127.0.0.1' IDENTIFIED BY 'roundpass';
FLUSH PRIVILEGES;
Configuring Dovecot
Dovecot uses a specific directory and file structure to store email on disk. Create the required directories and a dedicated Linux user. Note the UID 150 in the useradd command; use an unused UID, or record the one assigned because later security settings need it.
mkdir /var/mailserver/vmail
useradd -r -u 150 -g mail -d /var/mailserver/vmail -s /sbin/nologin -c "Mailserver dir" vmail
chmod 770 /var/mailserver/vmail
chown vmail:mail /var/mailserver/vmail
Now that the directories exist, use apt-get to install Dovecot's packages, along with Postfix, ClamAV, Amavis, and SpamAssassin.
apt-get install postfix postfix-mysql dovecot-mysql dovecot-imapd postgrey amavis clamav clamav-daemon spamassassin libnet-dns-perl \
   pyzor razor arj bzip2 cabextract cpio file gzip nomarch pax unzip zip
During Postfix installation, you will be asked what kind of mail server you are configuring. Select Internet Site, then enter the mail server's hostname when prompted.
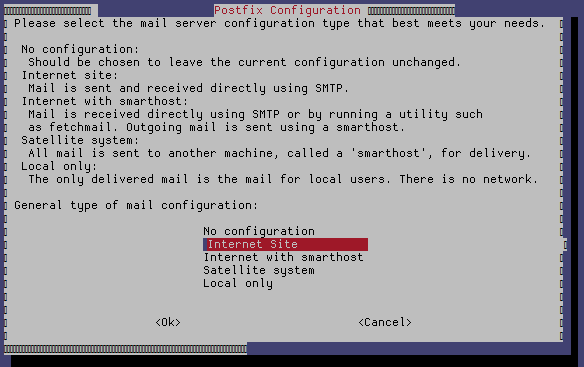
After installing the packages, adjust Dovecot directory permissions so the vmail user created earlier can read them.
chown -R vmail:dovecot /etc/dovecot
chmod -R o-rwx /etc/dovecot
The more involved part begins now: configure Dovecot's SQL module so it can read domains and mailboxes from the database created earlier. First, create /etc/dovecot/conf.d/auth-sql.conf.ext with the following content. This file specifies the files containing database queries for users and passwords.
passdb {
  driver = sql
  args = /etc/dovecot/dovecot-sql.conf.ext
}
userdb {
  driver = sql
  args = /etc/dovecot/dovecot-sql.conf.ext
}
Create the referenced file /etc/dovecot/dovecot-sql.conf.ext and fill it in as shown. It needs the username and password for the mail database created earlier. If you changed the mailbox directory, update the queries accordingly.
driver = mysql
connect = host=localhost dbname=mail user=mail password=mailpass
default_pass_scheme = MD5-CRYPT
password_query = \
  SELECT username as user, password, '/var/mailserver/vmail/%d/%n' as userdb_home, \
  'maildir:/var/mailserver/vmail/%d/%n' as userdb_mail, 150 as userdb_uid, 8 as userdb_gid \
  FROM mailbox WHERE username = '%u' AND active = '1'
user_query = \
  SELECT '/var/mailserver/vmail/%d/%n' as home, 'maildir:/var/mailserver/vmail/%d/%n' as mail, \
  150 AS uid, 8 AS gid, concat('dirsize:storage=', quota) AS quota \
  FROM mailbox WHERE username = '%u' AND active = '1'
After configuring the queries, change a few settings in /etc/dovecot/conf.d/10-auth.conf. This file controls several Dovecot authentication settings. For now, change only the options shown below; do not replace the entire file.
disable_plaintext_auth = yes
auth_mechanisms = plain login

# Comente a autenticação do auth-system e habilite a autenticação por sql
# !include auth-system.conf.ext
!include auth-sql.conf.ext
Next, adjust Dovecot's security settings so it uses only files in its mailboxes. Edit /etc/dovecot/conf.d/10-mail.conf and change the parameters below.
mail_location = maildir:/var/mailserver/vmail/%d/%n
mail_uid = vmail
mail_gid = mail
# lembre-se do uid usado na criação do usuário vmail
first_valid_uid = 150
last_valid_uid = 150
Dovecot also serves encrypted connections. Configure /etc/dovecot/conf.d/10-ssl.conf with the certificate paths created at the beginning of this guide. If your certificate authority provided an intermediate certificate, remember to set ssl_ca; it can be a .pem or .crt file.
ssl = yes
ssl_cert = </etc/ssl/certs/mail.exemplo.com.crt
ssl_key = </etc/ssl/private/mail.exemplo.com.key
# Certificado com senha, descomente e preencha a linha abaixo
#ssl_key_password =
# Certificado intermediário, descomente e preencha a linha abaixo
#ssl_ca = </etc/ssl/certs/cacert.pem
ssl_verify_client_cert = no
Adjust /etc/dovecot/conf.d/10-master.conf so Postfix can query mailboxes. Find the service auth section and replace only that block's contents.
service auth {
    unix_listener auth-userdb {
        mode = 0600
        user = vmail
        group = mail
    }
    unix_listener /var/spool/postfix/private/auth {
        mode = 0660
        user = postfix
        group = postfix
    }
}
The last required Dovecot setting is the postmaster email address. If you do not set it in /etc/dovecot/conf.d/15-lda.conf, you will likely see errors for every received message.
postmaster_address = postmaster@exemplo.comThat is all for Dovecot. Next, configure Postfix.
Configuring Postfix
Postfix also needs SQL configuration for mapping mailboxes and addresses. Edit the following files. Each needs the username, password, and database name created earlier. You can replace the entire contents if the files already exist.
File /etc/postfix/mysql_virtual_alias_domainaliases_maps.cf
user = mail
password = mailpass
hosts = 127.0.0.1
dbname = mail
query = SELECT goto FROM alias,alias_domain
  WHERE alias_domain.alias_domain = '%d'
  AND alias.address=concat('%u', '@', alias_domain.target_domain)
  AND alias.active = 1
File /etc/postfix/mysql_virtual_alias_maps.cf
user = mail
password = mailpass
hosts = 127.0.0.1
dbname = mail
table = alias
select_field = goto
where_field = address
additional_conditions = and active = '1'
File /etc/postfix/mysql_virtual_domains_maps.cf
user = mail
password = mailpass
hosts = 127.0.0.1
dbname = mail
table = domain
select_field = domain
where_field = domain
additional_conditions = and backupmx = '0' and active = '1'
File /etc/postfix/mysql_virtual_mailbox_domainaliases_maps.cf
user = mail
password = mailpass
hosts = 127.0.0.1
dbname = mail
query = SELECT maildir FROM mailbox, alias_domain
  WHERE alias_domain.alias_domain = '%d'
  AND mailbox.username=concat('%u', '@', alias_domain.target_domain )
  AND mailbox.active = 1
File /etc/postfix/mysql_virtual_mailbox_maps.cf
user = mail
password = mailpass
hosts = 127.0.0.1
dbname = mail
table = mailbox
select_field = CONCAT(domain, '/', local_part)
where_field = username
additional_conditions = and active = '1'
Postfix can also clean up email headers. Applications often add headers identifying the email client and your machine's IP address. We will configure Postfix to remove some of them. Create /etc/postfix/header_checks and add the following content.
/^Received:/                 IGNORE
/^User-Agent:/               IGNORE
/^X-Mailer:/                 IGNORE
/^X-Originating-IP:/         IGNORE
Now configure Postfix itself. There are many adjustable parameters; I recommend editing the following settings in /etc/postfix/main.cf. The comments briefly explain the most important ones.
# O banner é a mensagem apresentada quando algum usuário conecta na porta do Postfix
smtpd_banner = $myhostname ESMTP $mail_name
# Desative o biff, visto que nenhum usuário usará o e-mail diretamente pelo bash
biff = no

# Desative a adição automática de e-mail, pois vamos servir mais de um domínio
append_dot_mydomain = no

# Integração com o Dovecot
smtpd_sasl_type = dovecot
smtpd_sasl_path = private/auth
smtpd_sasl_auth_enable = yes
broken_sasl_auth_clients = yes
smtpd_sasl_security_options = noanonymous
smtpd_sasl_local_domain =
smtpd_sasl_authenticated_header = yes

# Configurações de SSL/TLS
# Configure aqui exatamente os certificados que você criou anteriormente e que foram configurados no dovecot
smtpd_tls_cert_file=/etc/ssl/certs/mail.exemplo.com.crt
smtpd_tls_key_file=/etc/ssl/private/mail.exemplo.com.key
#smtpd_tls_CAfile=/etc/ssl/certs/cacert.pem
smtpd_use_tls=yes
smtpd_tls_security_level = may
smtp_tls_security_level = may

# Algumas configurações adicionais do SSL/TLS, é importante pelo menos deixar o loglevel = 1 durante a instalação
smtpd_tls_session_cache_database = btree:${data_directory}/smtpd_scache
smtp_tls_session_cache_database = btree:${data_directory}/smtp_scache
smtp_tls_note_starttls_offer = yes
smtpd_tls_loglevel = 1
smtpd_tls_received_header = yes
smtpd_tls_session_cache_timeout = 3600s
tls_random_source = dev:/dev/urandom

# Configuramos quais são os filtros usados para restringir o recebimento de e-mail
# Note que há inclusive o endereço do Postgrey (na porta 10023)
smtpd_relay_restrictions = reject_unauth_pipelining, permit_mynetworks, permit_sasl_authenticated, reject_non_fqdn_recipient, reject_unknown_recipient_domain, reject_unauth_destination, check_policy_service inet:127.0.0.1:10023, permit

smtpd_recipient_restrictions = reject_unauth_pipelining, permit_mynetworks, permit_sasl_authenticated, reject_non_fqdn_recipient, reject_unknown_recipient_domain, reject_unauth_destination, check_policy_service inet:127.0.0.1:10023, permit


# Configuramos quais são os filtros usados para restringir quem pode conectar ao servidor
smtpd_helo_restrictions = permit_mynetworks, warn_if_reject reject_non_fqdn_hostname, reject_invalid_hostname, permit

# Configuramos quais são os filtros usados para restringir quem envia e-mail
smtpd_sender_restrictions = permit_sasl_authenticated, permit_mynetworks, warn_if_reject reject_non_fqdn_sender, reject_unknown_sender_domain, reject_unauth_pipelining, permit

# Restrições baseadas no contexto de quem já está conectado ao servidor
smtpd_client_restrictions = reject_rbl_client sbl.spamhaus.org, reject_rbl_client blackholes.easynet.nl, reject_rbl_client dnsbl.njabl.org

# Restrições de filtragem de acordo com o conteúdo do e-mail
smtpd_data_restrictions = reject_unauth_pipelining


# Algumas configurações de timeout
unknown_local_recipient_reject_code = 450
maximal_queue_lifetime = 7d
minimal_backoff_time = 1000s
maximal_backoff_time = 8000s
smtp_helo_timeout = 60s
smtpd_recipient_limit = 16
smtpd_soft_error_limit = 3
smtpd_hard_error_limit = 12

# Algumas configurações de segurança
smtpd_helo_required = yes
smtpd_delay_reject = yes
disable_vrfy_command = yes


# Configuração de hostname e nome de origem
myhostname = mail.exemplo.com
myorigin = /etc/hostname

# Configuração de destino (se você tiver erros, preencha "." ou deixe vazio)
mydestination = localhost
mynetworks = 127.0.0.0/8 [::ffff:127.0.0.0]/104 [::1]/128
mailbox_size_limit = 0
recipient_delimiter = +
inet_interfaces = all
mynetworks_style = host

# Configurações de pastas e dos arquivos que permitem a leitura de domínios e caixas de e-mail
virtual_mailbox_base = /var/mailserver/vmail
virtual_mailbox_maps = mysql:/etc/postfix/mysql_virtual_mailbox_maps.cf, mysql:/etc/postfix/mysql_virtual_mailbox_domainaliases_maps.cf
virtual_uid_maps = static:150
virtual_gid_maps = static:8
virtual_alias_maps = mysql:/etc/postfix/mysql_virtual_alias_maps.cf, mysql:/etc/postfix/mysql_virtual_alias_domainaliases_maps.cf
virtual_mailbox_domains = mysql:/etc/postfix/mysql_virtual_domains_maps.cf

# Indicamos quem irá armazenar os e-mails
virtual_transport = dovecot

# Indicamos qual é o filtro de e-mail usado para antivírus e detecção de SPAM
content_filter = amavis:[127.0.0.1]:10024

# Indicamos o arquivo de cabeçalhos que iremos remover
header_checks = regexp:/etc/postfix/header_checks

# Indicamos que o Postfix não deve adicionar o cabeçalho com o nome da caixa de e-mail que enviou o e-mail
enable_original_recipient = no
You also need to edit /etc/postfix/master.cf. This file configures the Postfix processes used to handle incoming and outgoing email. I recommend backing up the original for reference, then replacing the file with the following content.
# Postfix master process configuration file.  For details on the format
# of the file, see the master(5) manual page (command: "man 5 master").
#
# Do not forget to execute "postfix reload" after editing this file.
#
# ==========================================================================
# service type  private unpriv  chroot  wakeup  maxproc command + args
#               (yes)   (yes)   (yes)   (never) (100)
# ==========================================================================

# SMTP na porta 25
smtp      inet  n       -       -       -       -       smtpd

# SMTP com STARTTLS na porta 587
submission inet n       -       -       -       -       smtpd
  -o syslog_name=postfix/submission
  -o smtpd_tls_security_level=encrypt
  -o smtpd_sasl_auth_enable=yes
  -o smtpd_enforce_tls=yes
  -o smtpd_client_restrictions=permit_sasl_authenticated,reject_unauth_destination,reject
  -o smtpd_sasl_tls_security_options=noanonymous

# SMTP com SSL/TLS na porta 465
smtps     inet  n       -       -       -       -       smtpd
  -o syslog_name=postfix/smtps
  -o smtpd_tls_wrappermode=yes
  -o smtpd_sasl_auth_enable=yes
  -o smtpd_tls_auth_only=yes
  -o smtpd_client_restrictions=permit_sasl_authenticated,reject_unauth_destination,reject
  -o smtpd_sasl_security_options=noanonymous,noplaintext
  -o smtpd_sasl_tls_security_options=noanonymous

# Outros processos relacionados a limpeza da fila de e-mails e filtragens
pickup    fifo  n       -       -       60      1       pickup
  -o content_filter=
  -o receive_override_options=no_header_body_checks
cleanup   unix  n       -       -       -       0       cleanup
qmgr      fifo  n       -       n       300     1       qmgr
tlsmgr    unix  -       -       -       1000?   1       tlsmgr
rewrite   unix  -       -       -       -       -       trivial-rewrite
bounce    unix  -       -       -       -       0       bounce
defer     unix  -       -       -       -       0       bounce
trace     unix  -       -       -       -       0       bounce
verify    unix  -       -       -       -       1       verify
flush     unix  n       -       -       1000?   0       flush
proxymap  unix  -       -       n       -       -       proxymap
proxywrite unix -       -       n       -       1       proxymap
smtp      unix  -       -       -       -       -       smtp
relay     unix  -       -       -       -       -       smtp
showq     unix  n       -       -       -       -       showq
error     unix  -       -       -       -       -       error
retry     unix  -       -       -       -       -       error
discard   unix  -       -       -       -       -       discard
local     unix  -       n       n       -       -       local
virtual   unix  -       n       n       -       -       virtual
lmtp      unix  -       -       -       -       -       lmtp
anvil     unix  -       -       -       -       1       anvil
scache    unix  -       -       -       -       1       scache

# Configuração da interface com o maildrop/sendmail
maildrop  unix  -       n       n       -       -       pipe
  flags=DRhu user=vmail argv=/usr/bin/maildrop -d ${recipient}

# Configuração da interface com o UUCP (se desejável)
uucp      unix  -       n       n       -       -       pipe
  flags=Fqhu user=uucp argv=uux -r -n -z -a$sender - $nexthop!rmail ($recipient)

# Outros métodos de envio de e-mail
ifmail    unix  -       n       n       -       -       pipe
  flags=F user=ftn argv=/usr/lib/ifmail/ifmail -r $nexthop ($recipient)
bsmtp     unix  -       n       n       -       -       pipe
  flags=Fq. user=bsmtp argv=/usr/lib/bsmtp/bsmtp -t$nexthop -f$sender $recipient
scalemail-backend unix  -       n       n       -       2       pipe
  flags=R user=scalemail argv=/usr/lib/scalemail/bin/scalemail-store ${nexthop} ${user} ${extension}
mailman   unix  -       n       n       -       -       pipe
  flags=FR user=list argv=/usr/lib/mailman/bin/postfix-to-mailman.py
  ${nexthop} ${user}

# Integração com o Amavis e o SpamAssassin
amavis      unix    -       -       -       -       3       smtp
  -o smtp_data_done_timeout=1200
  -o smtp_send_xforward_command=yes
  -o disable_dns_lookups=yes
  -o max_use=20
127.0.0.1:10025 inet    n       -       -       -       -       smtpd
  -o content_filter=
  -o local_recipient_maps=
  -o relay_recipient_maps=
  -o smtpd_restriction_classes=
  -o smtpd_delay_reject=no
  -o smtpd_client_restrictions=permit_mynetworks,reject
  -o smtpd_helo_restrictions=
  -o smtpd_sender_restrictions=
  -o smtpd_recipient_restrictions=permit_mynetworks,reject
  -o smtpd_data_restrictions=reject_unauth_pipelining
  -o smtpd_end_of_data_restrictions=
  -o mynetworks=127.0.0.0/8
  -o smtpd_error_sleep_time=0
  -o smtpd_soft_error_limit=1001
  -o smtpd_hard_error_limit=1000
  -o smtpd_client_connection_count_limit=0
  -o smtpd_client_connection_rate_limit=0
  -o receive_override_options=no_header_body_checks,no_unknown_recipient_checks

# Integração com o Dovecot
dovecot      unix   -        n      n       -       -   pipe
  flags=DRhu user=vmail:mail argv=/usr/lib/dovecot/dovecot-lda -d $(recipient)
Options in this file override settings in the main configuration. If a change there appears to have no effect, check whether this file overrides the parameter.
Configuring Amavis, ClamAV, and SpamAssassin
Configuring these three applications is simpler than configuring Dovecot and Postfix. First, add the clamav and amavis users to each other's groups.
adduser clamav amavis
adduser amavis clamav
Edit /etc/amavis/conf.d/15-content_filter_mode to specify which filters Amavis should run.
@bypass_virus_checks_maps = (
   \%bypass_virus_checks, \@bypass_virus_checks_acl, \$bypass_virus_checks_re);

@bypass_spam_checks_maps = (
   \%bypass_spam_checks, \@bypass_spam_checks_acl, \$bypass_spam_checks_re);
Amavis also needs to query the domains on the server. Edit /etc/amavis/conf.d/50-user to configure database access, the maximum number of parallel processes, and the SpamAssassin score threshold for adding score headers. Here we use a negative value so the header is always available.
# Número de processos
$max_servers  = 3;

# Nível que irá apresentar
$sa_tag_level_deflt  = -9999;
# Nível no qual irá considerar SPAM
$sa_tag2_level_deflt = 5;
# Sem isso nem todos os e-mails serão analisados
@local_domains_maps = ['.'];

@lookup_sql_dsn = (
    ['DBI:mysql:database=mail;host=127.0.0.1;port=3306',
     'mail',
     'mailpass']);
$sql_select_policy = 'SELECT domain from domain WHERE CONCAT("@",domain) IN (%k)';

# $log_level = 2; # Nível de log, em produção deixe comentado
SpamAssassin is already configured to integrate with the other applications. Edit /etc/default/spamassassin to enable the service and its automatic updates of spam-probability tables.
ENABLED=1
CRON=1
Restarting services
After installation, restart all the services we configured.
service postfix restart
service spamassassin restart
service clamav-daemon restart
service amavis restart
service dovecot restart
If you see an error, check /var/log/mail.log and /var/log/mail.err.
Installing PostfixAdmin
Now that the applications are configured, install the mailbox manager. This practical open-source tool manages the tables created in the mail database.
cd /var/mailserver/webmail
wget 'http://bit.ly/1b7p2Cu' -O postfix.tar.gz
tar xvzf postfix.tar.gz
mv postfixadmin-2.3.6/ postfixadm
rm postfix.tar.gz
Configure a few settings in /var/mailserver/webmail/postfixadm/config.inc.php so the application can connect to the database.
$CONF['configured'] = true;
$CONF['setup_password'] = ''; // Deixe vazio por enquanto
$CONF['postfix_admin_url'] = 'http://mail.exemplo.com/postfixadm';
$CONF['admin_email'] = 'root@mail.exemplo.com';
$CONF['database_type'] = 'mysqli';
$CONF['database_host'] = 'localhost';
$CONF['database_user'] = 'mail';
$CONF['database_password'] = 'mailpass';
$CONF['database_name'] = 'mail';
Open http://mail.example.com/postfixadm/setup.php, enter a value in the setup password field (this password is used only during PostfixAdmin setup), and click Create administrator. Copy the hash shown on the page and paste it into $CONF['setup_password'] as instructed.
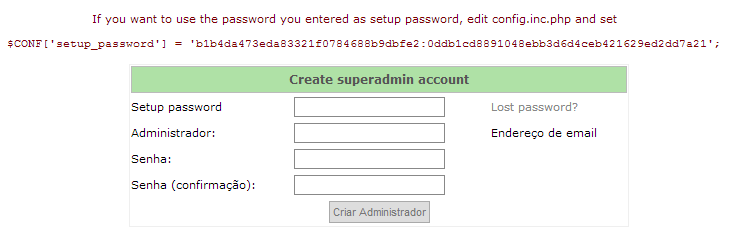
Return to the setup page (refresh it if it is already open) and create the administrator user. Use this account to configure domains and mailboxes at http://mail.example.com/postfixadm/login.php.
Open the login URL and add your domain under Domains > Add. Then choose Virtual > Create email account to create your first mailbox.
For security, delete setup.php so nobody else can try to configure the administrator account.
rm /var/mailserver/webmail/postfixadm/setup.phpInstalling Roundcube
Installing Roundcube is simple. Download the current version and unpack it into the webmail directory. The commands below may differ for versions other than 0.9.5.
cd /var/mailserver/webmail
wget 'http://bit.ly/1c4eAtb' -O roundcube.tar.gz
tar xvzf roundcube.tar.gz
mv roundcubemail-0.9.5/* .
mv roundcubemail-0.9.5/.htaccess .
rm -rf roundcubemail-0.9.5/ roundcube.tar.gz
chown www-data:www-data temp/ logs/
mysql -u roundcube -p -D roundcube < SQL/mysql.initial.sql
Open http://mail.example.com/installer/ and check whether any server settings are missing. You only need to configure MySQL for the database.
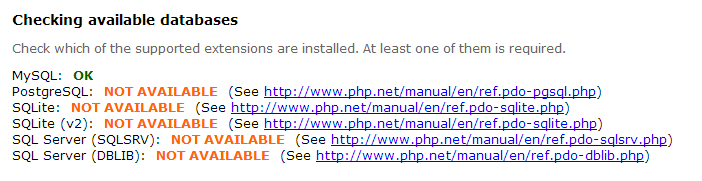
Next, configure SMTP/IMAP and the database.
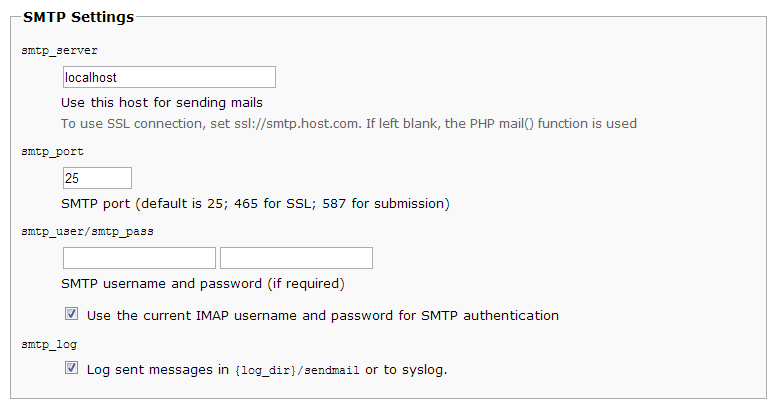
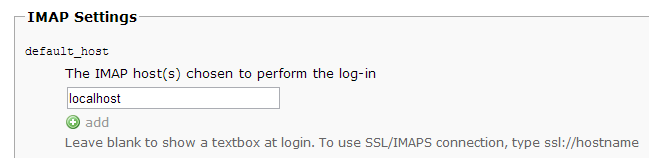
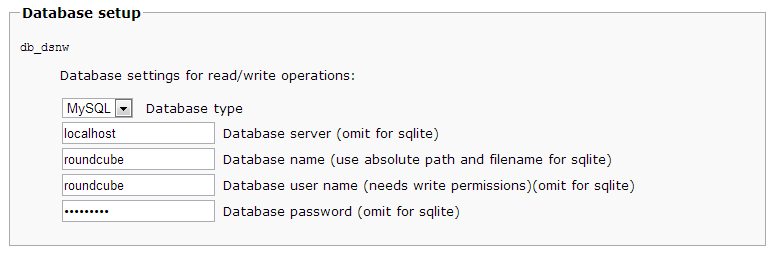
After configuring these settings, click Create config. The page will show two configuration files. Create both files and paste in the corresponding contents.
Edit /var/mailserver/webmail/config/main.inc.php and /var/mailserver/webmail/config/db.inc.php. After saving both, you can delete the Roundcube installer directory.
rm -rf /var/mailserver/webmail/installer/Enforcing HTTPS
To ensure users access webmail only over a secure connection (Apache HTTPS was configured earlier), edit /var/mailserver/webmail/.htaccess and add the following at the beginning.
RewriteEngine On
RewriteCond %{SERVER_PORT} 80
RewriteRule ^(.*) https://mail.exemplo.com/$1 [L]
This redirect forces webmail users to use Apache port 443, which helps prevent an unsuspecting user from having their password stolen.
Firewall configuration
I also recommend configuring a firewall. See a basic firewall example here, then add rules to allow the ports required by the email service. This setup uses the following ports:
25 (SMTP): unencrypted email delivery;
80 (HTTP): unencrypted web-server access for Roundcube and PostfixAdmin;
110 (POP3): unencrypted POP3 access, commonly used to download and remove messages from a mailbox;
143 (IMAP): IMAP access, commonly used to view mailboxes without downloading and removing messages, with optional STARTTLS encryption;
443 (HTTPS): encrypted web-server access;
465 (SMTPS): email delivery with mandatory SSL/TLS encryption;
587 (SMTP/SMTPS): email submission with optional STARTTLS encryption;
993 (IMAPS): IMAP access with mandatory SSL/TLS encryption;
995 (POP3S): POP3 access with mandatory SSL/TLS encryption;
The iptables rules to allow these ports follow.
iptables -A INPUT -p tcp -m multiport --destination-ports 80,443 -j ACCEPT
iptables -A INPUT -p tcp -m multiport --destination-ports 25,110,143 -j ACCEPT
iptables -A INPUT -p tcp -m multiport --destination-ports 443,465,587,993,995 -j ACCEPT
Important note about port 25: Antispam.br recommends that residential internet providers block access to server port 25 to reduce spam bots and malicious tools (more information). However, do not block this port in your firewall; doing so may prevent many domains from delivering email to you.
DNS configuration
After configuring the server, set up DNS outside the mail server. DNS tells other servers that the mail server for the domain configured in PostfixAdmin (example.com) is mail.example.com.
First, configure A and AAAA records (if IPv6 is available) for mail.example.com. An A record is recommended over a CNAME for anti-spam checks. You must also configure reverse DNS.
Reverse DNS uses a PTR record, which can only be configured by the company that assigned your IP address. This is where some people run into trouble. Providers such as Linode and DigitalOcean let you set the server name in their control panels. Amazon AWS may require a request form. If you are using an ADSL connection with a dynamic IP, your provider is unlikely to assign a name to it.
When an email server receives a message claiming to come from an IP address and domain, it may perform a reverse-DNS lookup to identify the server and compare it with lists of trusted or suspicious servers. This helps classify a message as legitimate or spam, so reverse DNS is important.
After configuring example.com in PostfixAdmin, create an MX record for mail.example.com. You can usually set a priority value; this matters when a domain has multiple mail servers, such as a backup server. Lower values have higher priority. If you use only one mail server, a priority of 10 is common.
Another important anti-spam setting is an SPF TXT record. Add a TXT record with content similar to this:
"v=spf1 mx ip4:111.222.333.444 ip6:2600:aaaa::bbbb:cccc:dddd:eeee/64 a:exemplo.com -all"
The full SPF syntax is beyond this guide; see the Antispam.br SPF documentation. The example says that servers receiving mail from this domain can trust the configured MX servers, the listed IPv4 or IPv6 addresses, or the IP address for example.com. Otherwise, they should treat it as spam (-all).
DNS changes may take 2–48 hours to propagate. Try to get the configuration right the first time.
Testing email delivery and reception
Once everything is configured, test sending and receiving email. Visit https://mail.example.com and log in with the full email address and password set up in PostfixAdmin.
Send a message to a Gmail account or another address you own and confirm it arrives. Then reply to it. If you see an error or the message does not arrive, check the error logs; they should help identify the problem.
You can also configure the account in Gmail, Thunderbird, or Outlook. Check the addresses and encryption type carefully. If you do not have a valid certificate or a firewall is blocking traffic, configuring SSL/TLS may take time; try STARTTLS.
Troubleshooting
Check the logs to identify problems. mail.log shows what happens to incoming and outgoing messages, including the response from a destination server when it accepts a message.
tail -f /var/log/mail.log /var/log/mail.errMessages waiting to be sent to another server remain in the outgoing queue, called the "mailqueue". View it with mailq on the server.
After changing Postfix settings, you can force the queue to be retried with sendmail -v -q.
References
This article is based mainly on guides by ExRatione and Flurdy, whose article is one of the most complete guides to Postfix-based email servers I have seen.
You can find other useful tutorials if you prefer not to use Postfix or Dovecot. The Linode library has several.