Varnish Cache: getting started
Varnish Cache is a reverse HTTP proxy that works as a cache between the client application and the HTTP server. It stores static page content in memory so the HTTP server does not have to serve it on every client request.
To understand how Varnish works and "speeds up" pages, it helps to understand browser caching. When you visit a web page, your browser loads dynamic content (such as HTML generated by a PHP script) and static content (such as images, JavaScript files, and CSS stylesheets). Caching makes the most sense for static content: in theory, a dynamic page is different on each visit and must be processed by the HTTP server every time, while static pages and images can be cached and reused.
Browsers and traditional proxies can both cache information. They usually sit in the client's infrastructure and work across the pages the client visits, avoiding requests to the HTTP server for static files and saving time and network connections. A reverse proxy sits in the content provider's infrastructure. It caches only information served by that provider, primarily to reduce work for the actual HTTP server.
Serving static pages is easy for any HTTP server, but Varnish can help with fewer resources. A server such as Apache keeps modules, configuration, and control processes in memory and checks the hard drive for changes to static files. Varnish is a specialized reverse proxy made of lightweight processes optimized to analyse requests, find content, and respond as quickly as possible while keeping static content in memory.
Varnish can also act as a load balancer with more than one backend. It can filter requests by source IP or URL and forward them to a particular HTTP server; you can even build your own CDN (Content Delivery Network). Varnish is designed from the ground up as a reverse HTTP proxy and is highly optimized—even the number of requests made to the operating system matters to its developers. This differs from Nginx, which also provides IMAP/POP3 proxying and an HTTP server.
How Varnish Cache works
You can install Varnish on the same hardware as the HTTP server, but that is not ideal for a high-performance environment. A dedicated Varnish server lets the cache meaningfully reduce load on the HTTP server.
When a user requests a page, the client connects to the reverse proxy on port 80. Varnish interprets the request and checks whether the requested content is in its in-memory cache. If it is, Varnish returns it immediately. Otherwise, Varnish connects to the HTTP server and forwards the request.
After the request, Varnish checks the HTTP server's response headers to see whether it can cache the content. If the server says a file can be cached for an hour, Varnish keeps it for that hour and avoids sending later requests for the same file to the HTTP server.
Reverse-proxy limitations
A reverse proxy has limitations and can cause problems in some cases. HTTPS content cannot be cached this way: encryption is performed by the HTTP server and decoded by the browser, so Varnish cannot read the request in transit without breaking the HTTPS model.
Caching can also cause unexpected results if developers do not know a reverse proxy is present. Developers or clients may change a page, JavaScript/CSS file, or image, yet the updated file may not reach clients even after they clear the browser cache. You need a way for users to clear Varnish's cache or wait for its cache lifetime to expire.
Installing Varnish Cache
On Debian-based systems, install the application as root with apt-get install varnish. Varnish is not available for Windows; it was designed for high performance on Linux. These instructions cover version 3.0 on Debian 7. File locations may differ on other distributions.
After installing Varnish, check /etc/default/varnish and make sure START is set to yes. The file contains several configuration examples; option 2 usually provides an in-memory configuration like this.
# Define que o serviço está ativo
START=yes
# Define principalmente qual é a porta que o Varnish deve usar
# e qual é a quantidade máxima de memória usada
DAEMON_OPTS="-a :80 \
             -T localhost:6082 \
             -S /etc/varnish/secret \
             -f /etc/varnish/default.vcl \
             -s malloc,256m"
Line 2 enables the service. Without this setting, Varnish will not start with /etc/init.d/varnish start or service varnish start. Line 5 sets the listening port. Line 6 creates an administrative interface for clearing the cache, restarting, and monitoring the service with command-line tools. Line 7 sets the file containing the access key to secure that interface.
Varnish needs a .vcl file describing what to do for each request; line 8 points to it. Line 9 sets where cached information is stored. You can use a physical file, or—in this example—memory with malloc, limited to 256 MB of RAM.
Creating a .vcl file
The .vcl file can read request information, alter request or response data, specify how Varnish should process each request, and pass additional data to the HTTP server. Varnish uses different functions for each stage, from receiving a request to returning a response from the cache or backend server.
The image below shows the request-processing flow. The most important functions, and the ones usually adjusted in .vcl, are:
vcl_recv- handles a request as soon as it arrives;vcl_fetch- handles the HTTP server's response before returning the object to the client or saving it in the cache;vcl_error- defines what Varnish should do when a request fails;vcl_deliver- handles the response sent to the user after processing.
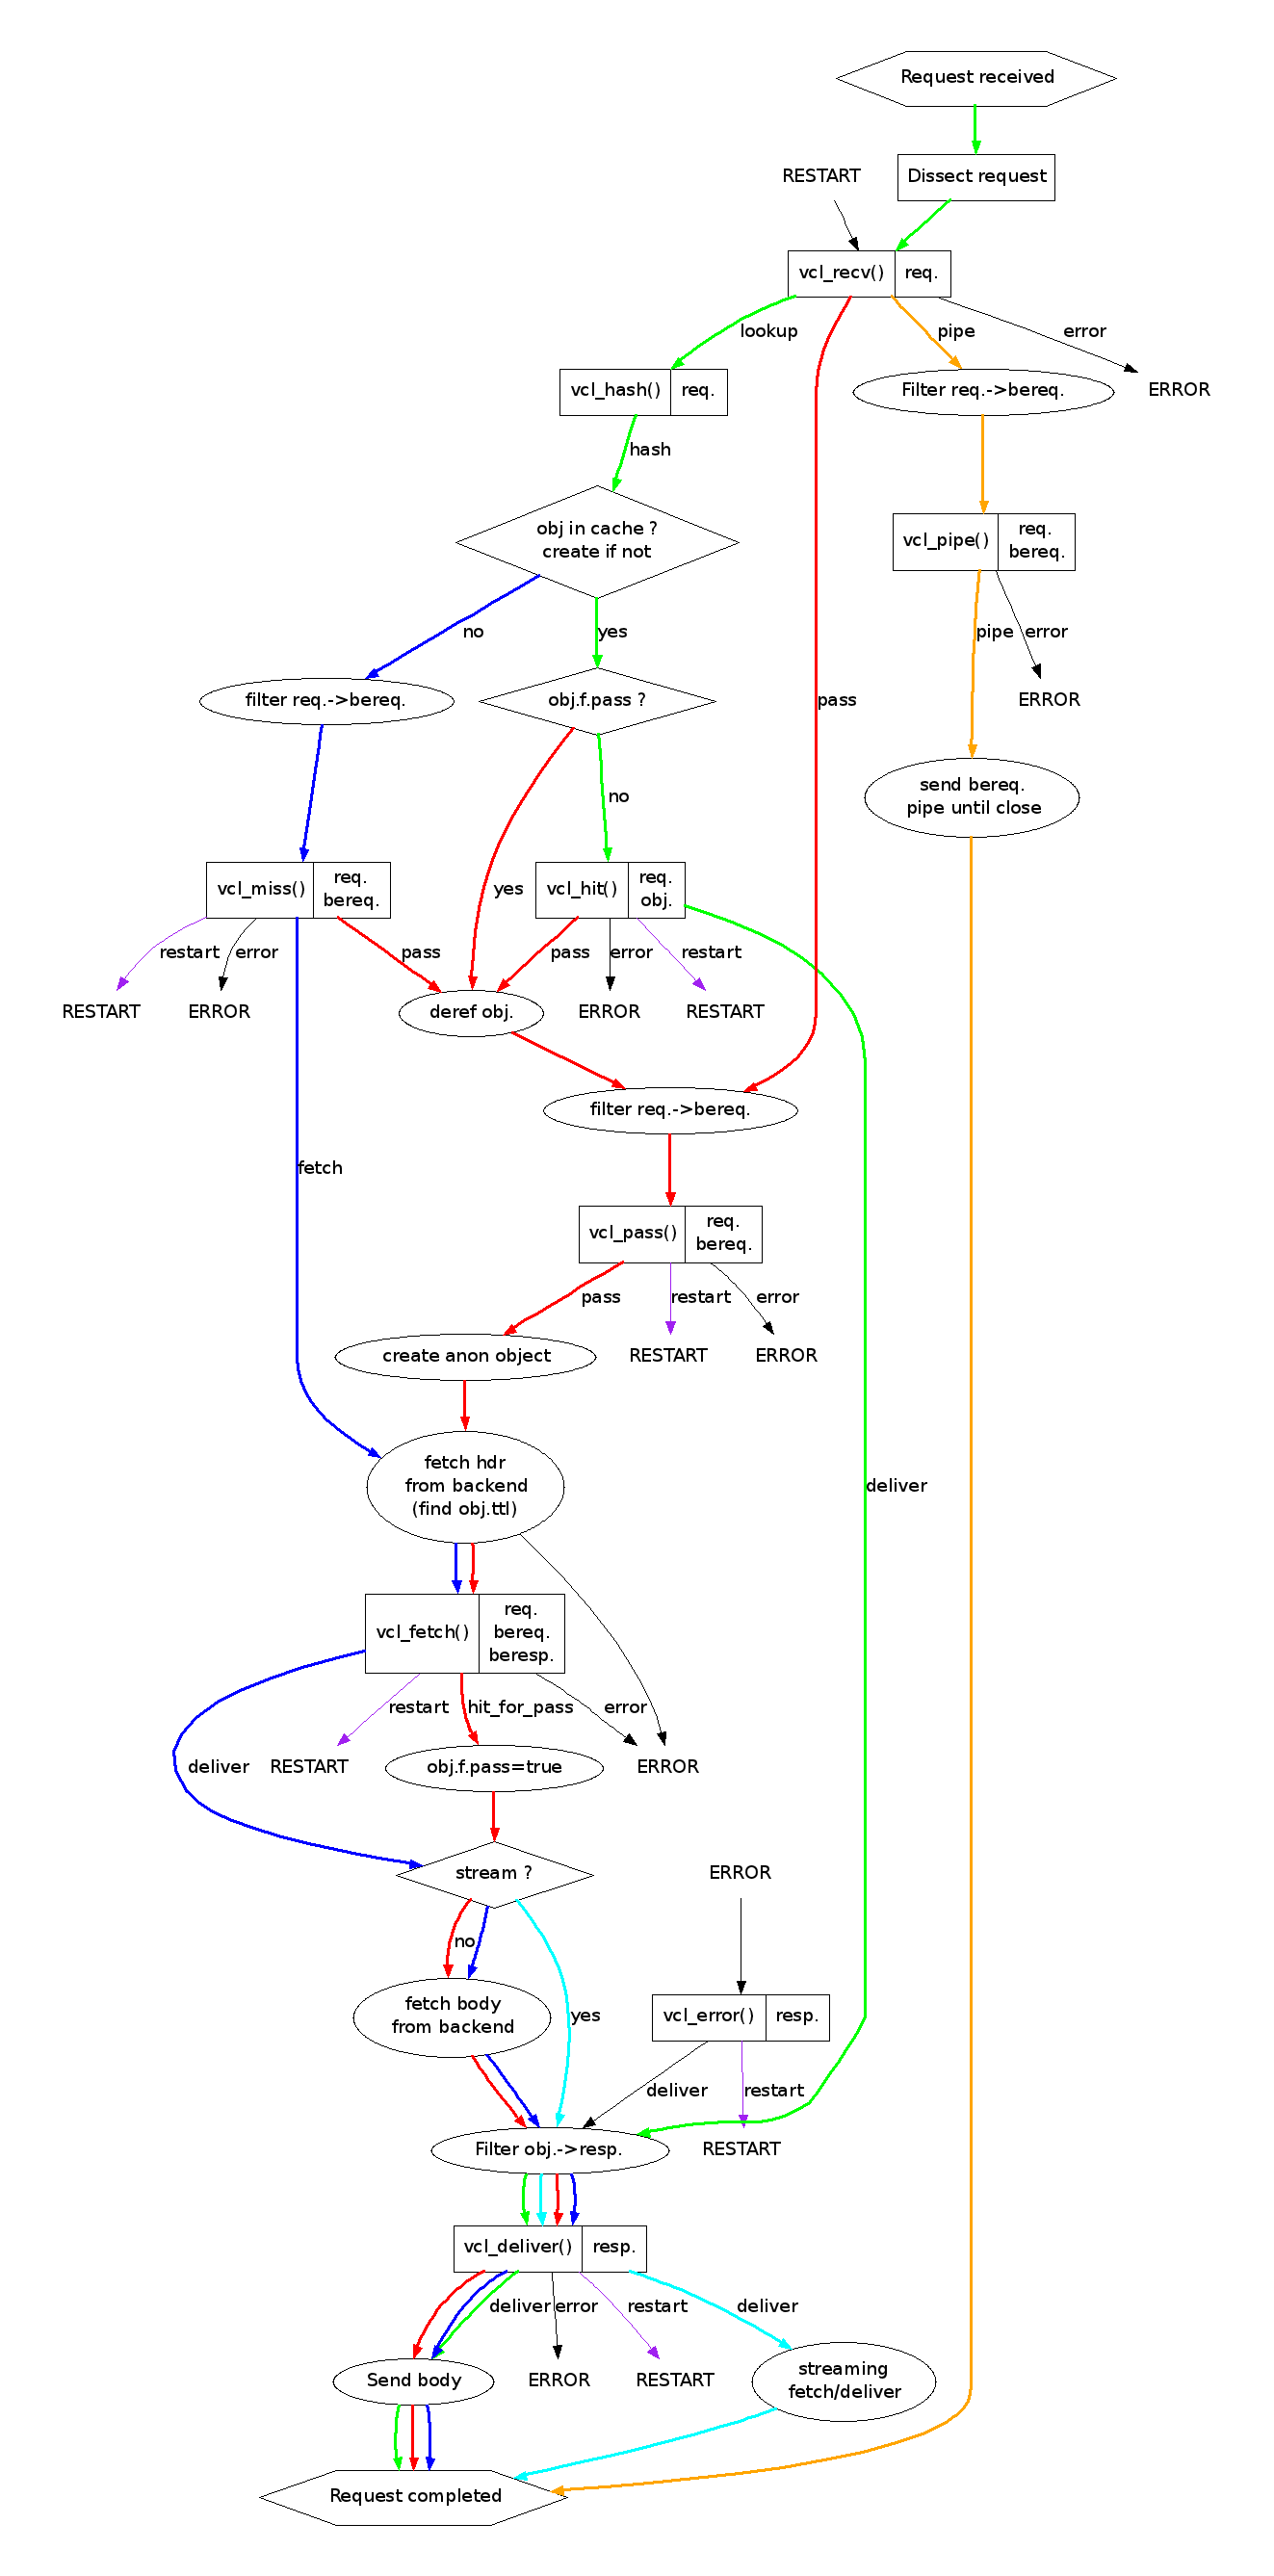
The example declares two functions: one receives the request, and the other handles the response to the client. The syntax resembles C because this file is compiled and linked to the original binary for maximum performance.
# Aqui definimos o backend (servidor HTTP real)
backend default {  .host = "127.0.0.1";  .port = "8080"; }
# Criamos uma rotina adicional para o recebimento da requisição
sub vcl_recv {
	if (req.restarts == 0) {
		if (req.http.x-forwarded-for) {
			set req.http.X-Forwarded-For = req.http.X-Forwarded-For + ", " + client.ip;
		} else {
			set req.http.X-Forwarded-For = client.ip;
		}
	}
	if (req.request != "GET" && req.request != "HEAD") {
		return (pass);
	}
	if (req.http.Authorization || req.http.Cookie) {
		return (pass);
	}
	return (lookup);
}
# E aqui tratamos a resposta ao cliente
sub vcl_deliver {
	set resp.http.X-Cache-Hits = "MeuServidor";
	if (obj.hits > 0) {
		set resp.http.X-Cache-Hits = resp.http.X-Org + "-" + obj.hits;
	}
	remove resp.http.X-Varnish;
	remove resp.http.Via;
	remove resp.http.Age;
	remove resp.http.Server;
	remove resp.http.X-Powered-By;
}
Line 2 defines the actual HTTP server. You can use a domain name instead of an IP address; this example uses the same machine on port 8080. Lines 5–11 add a header to the client request containing the client's real IP address. Without it, you cannot identify that address.
Lines 12–17 identify cases where the cache should be bypassed, such as requests with cookies, HTTP authentication, or POST data. return (pass) tells Varnish to send the request to the actual HTTP server whether or not a cached copy exists. Line 18 tells Varnish to look in the cache first and contact the server on a miss.
Lines 22–25 add the number of times an object was served from cache. You can inspect the HTTP header in your browser to see whether an object was cached. Lines 26–30 remove headers that could identify the actual HTTP server.
Finally, restart Varnish with service varnish restart.
Varnish 2.x and 3.x use different
.vclsyntax. A+in string concatenation indicates version 3, which these examples use.